An electronic load is a piece of lab test equipment that is used to observe the behavior of devices under test (DUTs) under electric load, i.e. how they behave when we draw power from them. Electronic loads achieve this by dissipating an adjustable amount of power in their circuits, such that either a constant current or a constant power is drawn from the DUT. Most of the commercially available electronic loads can do more than that and can even be configured to perform automatic tests on devices and log the results; this is why electronic loads are also known as programmable loads.
I need an electronic load to test my power electronics designs for battery and solar projects, and as a hobbyist I don’t want to spend much money on such a specific piece of kit. Besides, it is a great opportunity to learn about power electronics and the construction of precise equipment.
This project is separated into different stages. For now we’ll focus on the constant current mode of the electronic load and get a feel for the basic circuit, a proof of concept, so to speak. We’ll add more advanced features in subsequent posts.
Voltage to Current Converter
The basic building block of most electronic loads, including ours, is the voltage to current converter. This is a circuit that takes a voltage as an input and regulates a current to change according to the input voltage. For example, in the case of the constant current operation of our electronic load for each volt of input voltage at the voltage to current converter one ampere of current flows through the electronic load. The input voltage comes from a potentiometer, so with the turn of a knob we can adjust how much current we want to draw from the DUT.
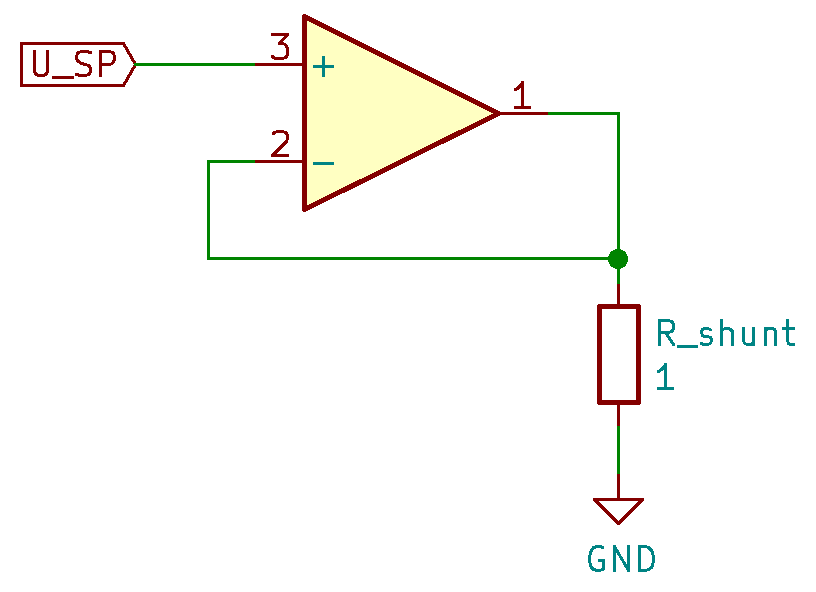
One way to realize a voltage to current converter is with an operational amplifier (OP), see schematic. In this circuit a current I_\mathrm{L}, the load current, flows through the resistor R_\mathrm{shunt}. According to Ohm’s law, this current causes a voltage V_\mathrm{shunt}=R_\mathrm{shunt}I_\mathrm{L} between the ports of R_\mathrm{shunt}. Thus, with the knowledge of the resistance R_\mathrm{shunt}, we know can tell the current I_\mathrm{L} by measuring the voltage V_\mathrm{shunt}. This is also the cause for the name we have given the resistor; resistors that are used to measure currents via the voltage drop across them are called shunts. In the example schematic and our final design we have a shunt resistance of 1\,\Omega, that means for every ampere of load current we measure one volt of shunt voltage.
The regulation of the current happens in the OP that compares the shuntvoltage V_\mathrm{shunt} at its inverting input to the setpoint voltage V_\mathrm{SP} at its positive input, and regulates its output voltage to a value that matches the two input voltages. This description is pretty simplified but I don’t want to go into the details of OPs in this article.
Great, now we have a circuit, that lets us control a current by adjusting a voltage. But where is this current coming from? It is sourced by the OP, not by the DUT. We could use the DUT to power the OP, thus, all the current the OP sources would come from the DUT. This has a number of disadvantages, though; the power consumption of the OP itself is added to the power draw off the DUT, but not measured at the shunt, we limit the design by the supply voltage requirements of the OP and most importantly, standard OPs can only source small amounts of current, up to 40\,\mathrm{mA} in the case of the LM358 I’m using. How can we circumvent this problem? For this design, we will use the OP to control the gate of a power MOSFET rather than sourcing the current directly.
MOSFET Shunt Network
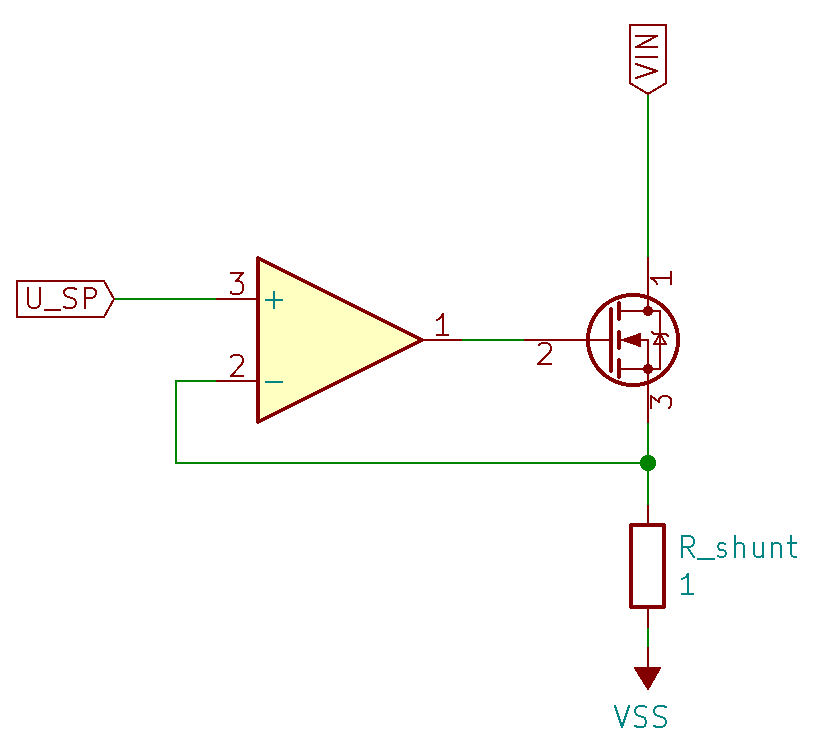
To build a voltage to current converter with a MOSFET, we need the current to pass through the drain-to-source path in the MOSFET and a voltage controlling the current at the gate. As you can see in the schematic on the left, we connected the negative terminal of the shunt resistor the the negative supply voltage of our circuit V_\mathrm{SS}. This means that V_\mathrm{SS} will be shorted to the negative input from the DUT.
The way this new circuit works is similar to the version without the MOSFET. The OP is input the shunt voltage V_\mathrm{shunt} and the setpoint voltage V_\mathrm{SP} and adjusts its output, such that the shunt voltage becomes equal to the setpoint voltage. In the version without the OP this means that the output voltage takes a value that caused the desired current in the shunt resistor, according to ohms law, but in the version with MOSFET it will cause the OP to output a value that causes the MOSFET to be just conductive enough to get the desired current value.
Ok, now that we can draw a desired and potentially big amount of current / power from the DUT, we should ask ourself an important question: Where is the energy going? In electronics, we have power losses at a component, whenever there is current and a voltage drop across the component at the same time. The power this component then dissipates in the form of heat is given by P=UI\ , with U being the voltage.
In our circuit the current comes from the DUT, flows through the MOSFET and the shunt resistor and then returns to the DUT, so we have energy dissipation at these two components. The power dissipated is given by the current and the resistace, since using Ohm’s law, we can represent the voltage drop across the resistor V_\mathrm{shunt} by the current I and the shunt resistance R_\mathrm{shunt}:P_\mathrm{shunt}=R_\mathrm{shunt}I^2\ . For the MOSFET the power dissipation is given by the product of the DUT current I and the voltage drop across the drain to source P_\mathrm{MOSFET}=(V_\mathrm{IN} – V_\mathrm{shunt})I\ . Since V_\mathrm{IN} is always greater than V_\mathrm{shunt} (otherwise there would be no current), the majority of the power is dissipated in the MOSFET.
We now have to pick components that can handle this much power disspiation, but to know which exact power rating we are looking for, we first have to ask ourselves what kind of inputs we want to feed into the electronic load. I would like it to be able to take input voltages up to 30\, \mathrm{V}, since this will allow me to characterize 7s LiPo batteries and I think 2\, \mathrm{A} should be plenty for now. I want to keep V_\mathrm{shunt} under 3.3\,\mathrm{V}, so I’m able to measure it with the integrated ADCs of some microcontrollers in the future and I also have a 2.5\,\mathrm{V} voltage reference that I can use, so with R_\mathrm{shunt}=1\,\mathrm{\Omega} the electronic load can take currents up to 2.5\,\mathrm{A}.
At 30\,\mathrm{V} and 2.5\,\mathrm{A} input we dissipate P_\mathrm{shunt}=6.25\,\mathrm{W} in the shunt and P_\mathrm{MOSFET}=68.75\,\mathrm{W}. For the shunt this means, we will be fine with a resistor rated for 10\,\mathrm{W}; this results in a maximum current of 3,16\,\mathrm{A}. For the MOSFET it would be nice to use a jelly bean part like the IRFZ44N. This transistor is rated for 94\,\mathrm{W}, so it will do just fine, and with its breakdown voltage of 55\,\mathrm{V} we can even take inputs up to 36\,\mathrm{V} at 2.5\,\mathrm{A} and be well within its power rating.
So, to summarize, our electronic load will have the following input ranges:
- Input voltage: 0 – 36\,\mathrm{V}
- Input current: 0 – 2.5\,\mathrm{A}
Final Schematic
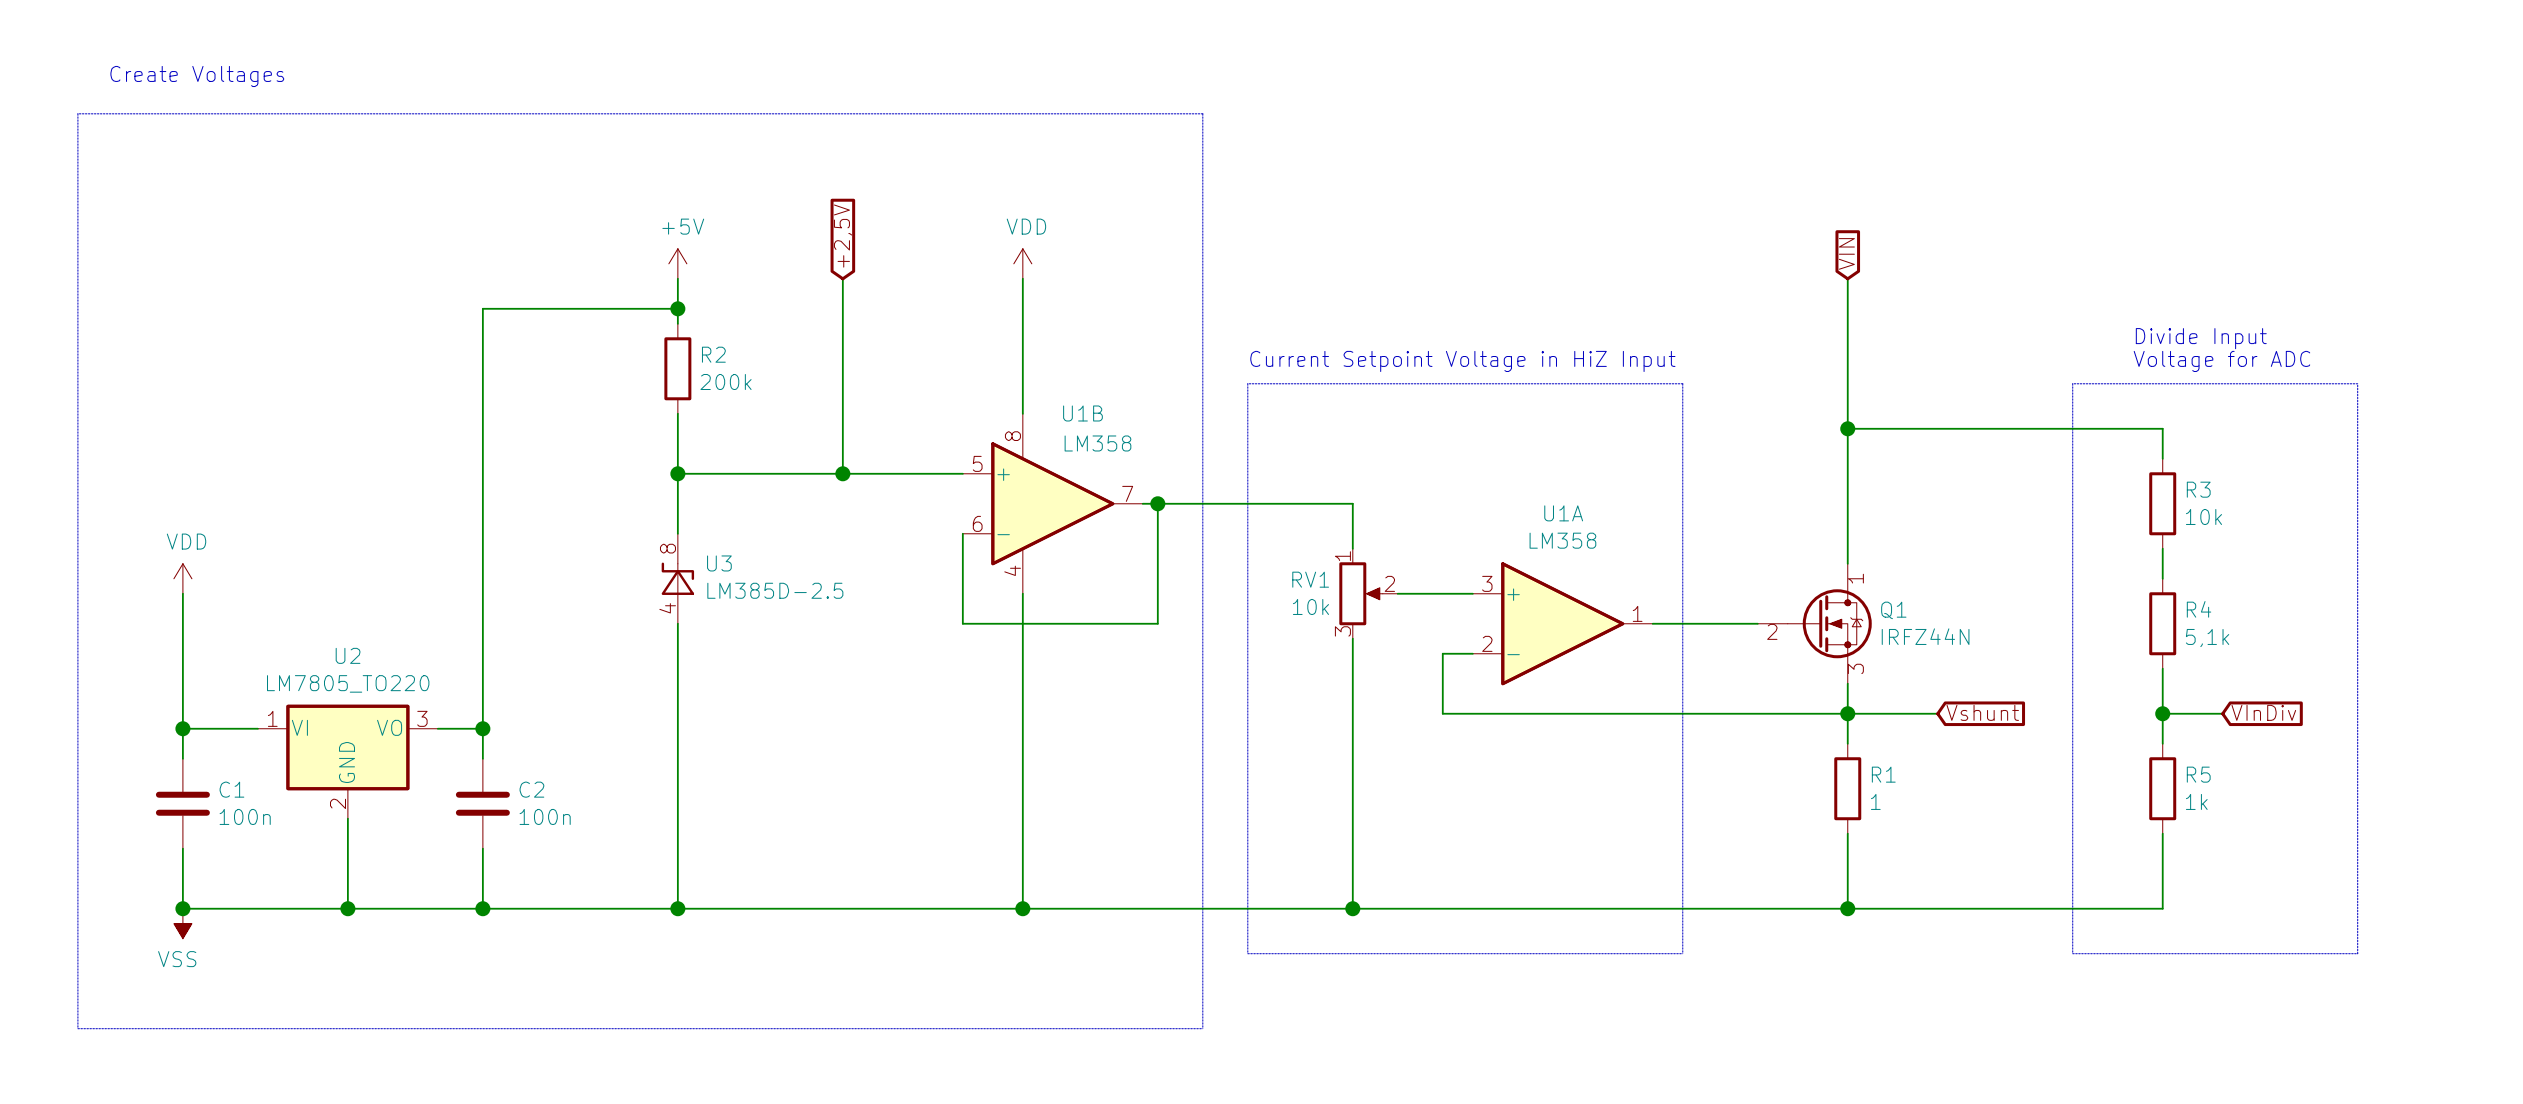
With the above considerations I end up with this Schematic, however, I added a voltage divider on the right, that maps the input voltage in the range of 0-2.5\,\mathrm{V} to be able to use that as well in future versions of the circuit.

Outlook
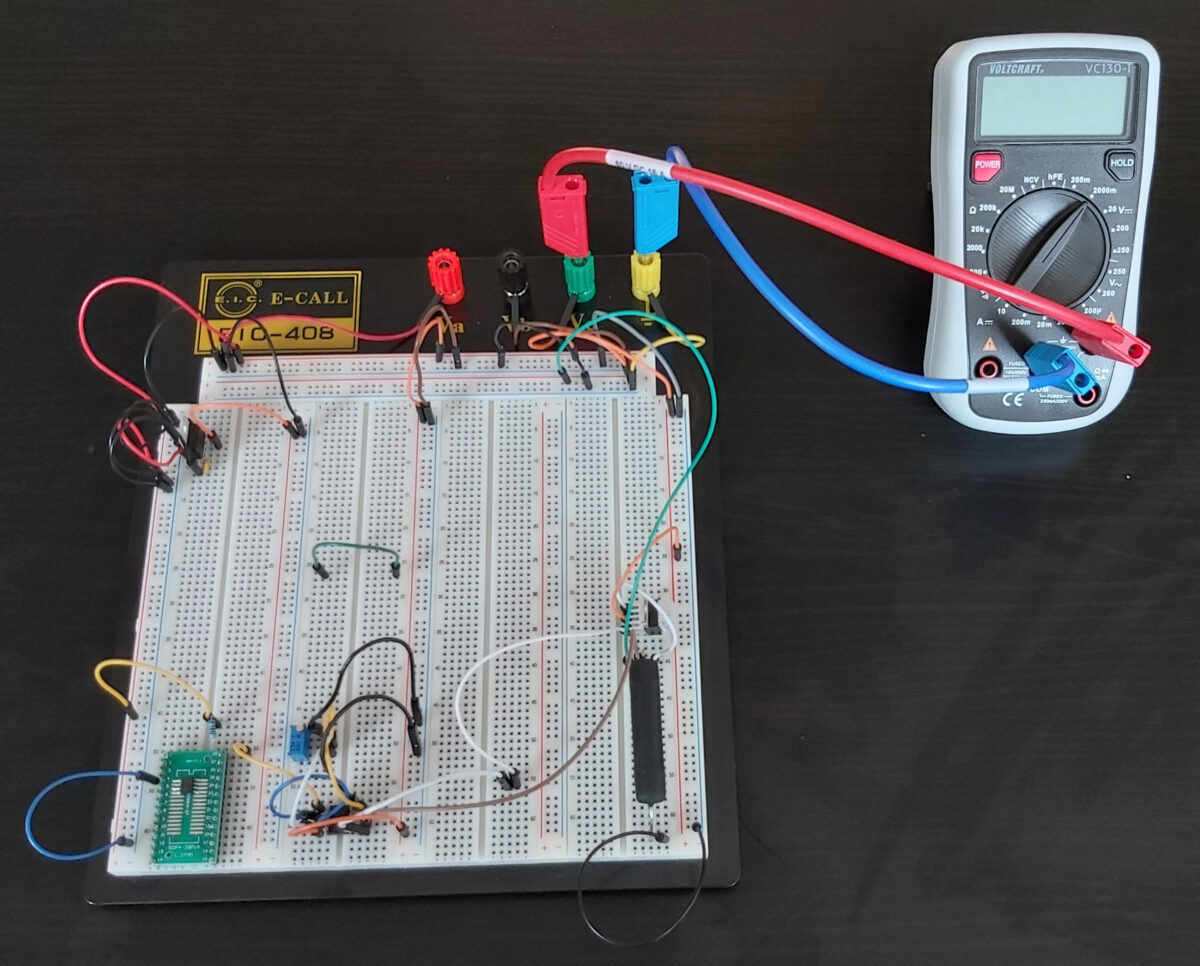
We successfully created a working proof of concept for an electronic load. It may be simple and not much to look at yet, but we can already test the behavior of DUTs loaded with a constant current.
Of course, I actually plan to use my electronic load in my lab and for this there still is a lot to do:
- Safety features that protect the circuit from overcurrent, overvoltage, overpower and overheating
- Moitoring and setpoint adjustment as part of the EL
- A case with a nice display, a knob and banana janes for the DUT
So stay tuned for updates!
Leave a Reply